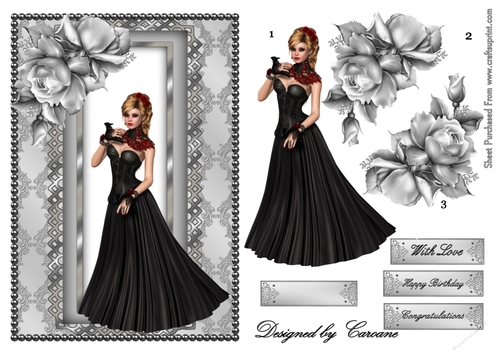


Class Act 2 - A4 design sheet for cardmaking
A4 design sheet for card making, containing an A5 card front and decoupage. A very elegant card suitable for many occasions, especially special ones.
Photographs from the Community


A classic card, for a young diva, a recent graduate, a rising teen star, or even a birthday celebration. This design is so sensitively portrayed in this black, silver and white design. I printed the sheet out three times, as I wanted to make use of some extra elements.
With that in mind, I stayed with the shades within the design, except for the largest backing sheet which I toned in with the main card. I used gloss, 200gsm card, to print out the sheet supplied. I cut out all the elements and used one of the toppers to cut out the thin, tiny silver gilt edge, cutting it open under the gown carefully, so I could re join the ends when attaching it. Then from that same section, left over from the topper, I cut out the mirror backing the diva.
Note: I included the surrounding zig, zag, art deco, effect. Iused the step by step method,and attached the mirror, with tiny padded, double sided dots, onto the main topper. I made up the rest of the card onto the base card before adding the very top elements.
I have used a standard salmon pink card, with a front measurement of,15 x 10.5cm.
I then used the following, to make the backing sheets. First a black textured card,10.5 x 8 cm. To the back of this, using double sided tape, I attached, 3 x 23cm lengths, of silver edged, black ribbon, each 0.5cm wide, and left the ends loose, while I used double sided tape to attach the black backing sheet to the silver, grey backing sheet, 11.5 x 9cm. I trimmed all four sides of the largest main backing sheet with a self adhesive peel off, in black glitter, with a silver edge. This main backing sheet is a salmon, tiny, delicate print, to tone in with the main card and measures 14 x 10.5cm. I then attached the rest of the backing sheets onto the salmon print.
Note: I measured up 2cm from the lower edge of the salmon print to attach the silver, grey backing sheet. This was to allow room for the bow. Once these steps were completed, I attached the ribbons to the back of the largest backing sheet with double sided tape.
Before I attached the final diva, I attached this completed section to the main card front with double sided tape. I then, used a step by step process, to attach the 2 rose sprays into position onto the topper, using padded double sided tape. I also used the same padded tape to attach the main topper to the backing sheets. I used the step by step process to attach the diva and the gown to the card, and from the spare diva, I cut out and kept the head, arms, bodice and hands to put in place for extra dimension with thin double sided dots. I used 1M of the same ribbon, folded into 3, to then tie a single knot in the centre and fan out the loops, to make a delicate bow. I attached the bow in place, with a small double sided padded dot. I added the sentiment last of all.
If you like the step by step method, and enjoy using your cutting skills, this is definitely, an excellent choice.
A big Hug and thank you, Caroane for a delightfully thought out design.
Pamela Horton


