


2 Fairies 3d Card in studio and svg formats; includes pdf file(s) artwork with Happy Birthday and Best Wishes greeting, no greeting version all with decoupage bloom elements, and Digistamp version if wish to colour in yourself with alcohol pens etc.
Also included is png versions of faerie artwork.
Full pdf instructions included in download and top right tab above
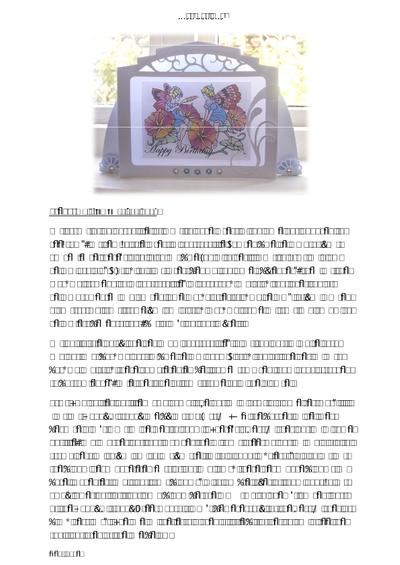
2 FAIRIES 3D CARD

Preparing Elements for Card Cut Front of 3d Card file.
If want to have insert in top panel ( as opposed to see-thru ), cut semi circle insert in Extras file – I used blue vellum ( for your convenience theres a solid colour blue jpg in folder if want to print on plain vellum as I did ) – Stick this cut insert behind top panel ( by edges ) , then cut the masking frame ( also in Extras file ) in cardstock and stick that over top of vellum ( to neaten and conceal glue marks after sticking vellum ) .
If you wanted a contrasting front frame you could stick masking frame on front and sandwich vellum etc beneath that, but didnt do that myself.
Cut half circle daisy lace design ( in Extras file ) .
I cut top part in white card and optional backing part in blue vellum again – stick top of lace design onto backing and stick these completed embellishments ( I used foam pads attached to bottom edge ) , on either side of front frame as in the picture.
Print Two Fairies pdf file (using actual size option in print dialogue settings).
I cut out Happy Birthday one by cutting just WITHIN the border guide lines because didnt want guidelines to show. ( Theres a Best Wishes option in same pdf file, and another pdf that includes the without greeting option and a digital stamp version so you can colour yourself with alcohol inks etc. ) I also cut out the bloom decoupage elements of pdf and stuck these decoupage blooms on base image (left and right front blooms) with double layer of foam pads - I cut away lower half of right hand bloom before mounting so doesnt conceal part of the Happy Birthday Greeting ( this wont be necessary for the Best Wishes or blank versions ) .
The one on the left I placed a little bit offset so could see the top right area of the one belowAssembling CardCut Back of Card, Mountain fold inner score lines and Valley fold outer score lines of Back of Card and also the front of the card already cut.
Stick the cut out 2 fairies design on the panel at back of card – suggest you use glue that allows bit of movement before dries (suggest hold front and back of card together by outside flanges/panels when lining up exactly where to stick.. should be roughly central to the rectangular area ignoring the top angled area if that makes sense).
After mounting the fairy design on card back, stick front and back of 3d card together by outer flanges/panels Finally cut flourish design (again in Extras file) and position across right hand edge of frame as in picture..
I just applied glue to either end, so the small curled flourishes float more naturally..
There are also 2 side panel overlays in Extras file if wish to use for contrasting colour side panels, havent used in design above Finished off card with a few gems Folds flat for posting I have also included 2 transparent A5 png files of the without greeting and digi stamp fairies – this is to assist anyone who wants to set up a print and cut for whole design outline, although in my mind it wasnt necessary for this design, crafters may wish to use for other projects so png file may be useful For Cricut users ( svgs dont import into Cricut design Space at correct native size ) The width of main card is 270mm and everything else in proportion in order for fairy design to fit correctly..
For Scanncut users Can use Direct Cut function if wish by putting printed pdf files on mat and scanning with Direct Cut function (b/w setting) ; cuts outside edge


Photographs from the Community

Clive Coulter - 2 Fairies 3D card
cup 808386_198_svg
Fuschia card 216 gsm
Pearls and glass beads
Easy to make - lovely effect
